
Chris Williams' Journal

Home Page: Chris W
Gosford, NSW, Australia
| Total Posts: 225 | Latest Post: 2026-01-22 |
| Table of Contents | RSS Feed |
On the way we went past the MG restorer who put me on to this car in the first place and saw he had another car for sale. Stopped, had a look but it just didn't feel right. Ran ok, interior ok, but I was concerned about the finish. Panels didn't fit right- obvious filler etc. Good price, $9,000, but just didn't 'click' with me.
Went on to the MG that I'd seen before. Spent a lot of time looking and talking about the car with owner and was feeling more and more relaxed about the car. It felt right - been sitting since '91 with the motor/gbox out all that time. Panels fit, nice and straight- a good honest car. Finish, ie paint was not good but no signs of any serious rust. Some surface rust on the joins front and back fender tops - very minor.
The car showing all the signs of having sat in a garage for 15 odd years.
Haggled a bit about price, but felt the price was good overall. So decided yes, shook on the deal and left feeling that I'd done the right thing.
My son took a few photos one of which is below. The others are at:
http://s114.photobucket.com/albums/n255/sweep_2006/

If you look closely on the left, you can just see the motor on an engine stand.
It was the events that occured when home that was the cause of some anxiety.
I had gone over in my mind several times the alternatives available to me to get the car where I wanted it at home.
We have a steep driveway which turns at 90 deg into a double garage(carport) at the bottom. I intended to drop car off at top of the drive, attach a tow rope between the front of MG and front of Patrol and lower the car backwards down the drive with my son steering. The problem occurred when the car would not roll easily - still not sure why - especially with steering close to lock. It was dark by this time and after several attempts at getting it into an appropriate position to be able to turn it down the drive, to cut a longer story short, tempers were well and truly frayed. Eventually got the car in place and tucked away for the night.
The following day I purchased an engine stand and with the help of a friend, Kevin, we got the motor onto the stand and started to clean it up.
The engine was originally maroon, had been painted blue - presumably as a result of having had some serious work done on it - and the top (what you would have been able to see) had been painted red.
I want to paint maroon - more like the original colour.
Scraped off much gunk, sprayed with degreaser, scrubbed and washed off with hot water. Did this twice. still needs some more degreasing/cleaning. Don't want to take of manifolds at this stage so am working around these. Bought some auto enamel, only doing block and head so doesn't need to be hi-temp, rasberry red. After dewax / greasing will apply with a brush to castiron bits only. Maybe the timing case as well but leaving the rocker cover the brighter red at this stage.
PO assured me the motor will run and as we have mutual aquaintences in the same MG club, it would not be in his interests to mislead me.
I've posted some more images at Photobucket .com
http://s114.photobucket.com/albums/n255/sweep_2006/
Geocities was causing some problems.

Winching the car onto the trailer

IMG 1244
No comments have been posted yet...
Want to leave a comment or ask the owner a question?
Sign in or register a new account — it's free
When it was dry I painted the entire motor with the red paint. I initially was only going to do the cast iron bits, but cutting in around the nuts and the sump and timing cover became too hard and these two bits were really grotty anyway, so I painted it all except the manifolds and the rocker cover. I used the swivel on the engine stand to tilt over the motor to make the painting easier and it was here I found that I'd positioned the motor too high on the stand. Very top heavy and I had a hairy moment when I almost 'lost' the motor as it tipped over too fast for me to comfortably control. I almost lost control and struggled at one stage with the weight of the motor in one hand trying to get the locking pin in with the other.
I'll support the motor on the winch and lower it on the stand, getting the centre of gravity closer to the pivot point of the stand.
Got a phone call from a friend, Graham, tonight and he told me he has a chain block for me. This will be great as the winch I'm using now is not designed for vertical lifts and it is dangerous to use. The chain block will be so much easier and, more importantly safer.
Should be able to pick that up over the weekend.
Here's a photo of the engine painted.

Engine with paint.
No comments have been posted yet...
Want to leave a comment or ask the owner a question?
Sign in or register a new account — it's free
I took off the heater control before I cleaned and painted and it was severely clogged with crap - completely blocked and corroded. I should have ditched it, but I tried to clean it. I managed ok 'cept I chipped the inner seal slightly. It would not be able to completely cut off. No big deal I thought.
During the week I came across the reference to the heater modification using a elbow and 1/4'' ballvalve. I liked this idea and after a little looking about have managed to gather together the bits I need to assemble this.
I may have a shot at doing this tomorrow.
Haven't been able to get the chain block from Graham as yet, but it's OK cause I won't need it yet. I'll post picture here if I complete it tomorrow.
No comments have been posted yet...
Want to leave a comment or ask the owner a question?
Sign in or register a new account — it's free
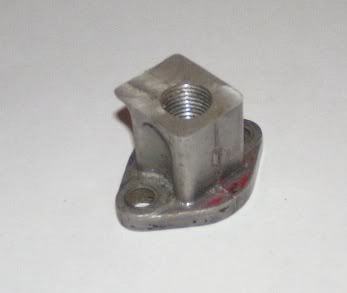
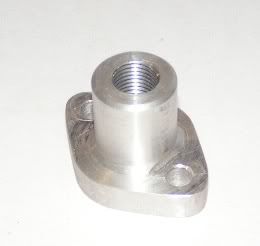
I attempted to make the modification and stuffed it up - drilled and tapped it the wrong size - good job except that it was useless.
http://i114.photobucket.com/albums/n255/sweep_2006/Heater%20Valve/PICT0772.jpg
After the severe beating I gave myself for being so stupid, I went through a few different options of constructing another and decided to machine a new one from a Al pulley casting blank. Well it worked out quiet well, I thought. Have a look and see what you think.
http://i114.photobucket.com/albums/n255/sweep_2006/Heater%20Valve/PICT0776.jpg
I haven't assembled the other bits yet and I haven't sorted the cable setup yet either but I'm a lot happier now than I was a few days ago.
Later this evening I made a engine lift bracket - copy of the one in the 'yellow book' which attaches to the front rocker cover bolt.
Have decided to change my attack and am now going to try to strip down further and remove guards, wire brush underneath and under guards and paint with grey POR-15.
Took off lights, front and rear and packed them away, David did most of this work. Will attack the interior soon.

Final result, eventually.
Want to leave a comment or ask the owner a question?
Sign in or register a new account — it's free
Put a post on the forum for some suggestions and got back some experiences and some good ideas. After a bit of 'to and fro' decided to make some materials enquiries. Went to Metaland - thinking 'this is going to cost big bucks' but was pleasantly surprised to see the 'off-cut' bin. Spoke to one of the guys, selected a few pieces - $25 - sounds good to me. Left with enough to put together these.

I had the green bits.
I was going to brace the centre pole, (I still may) but I have faith in my welds and I don't think it needs it.
I will, however, link the two together at the base with a tie bolted to each foot and I probably will put some castors on it. I'm going to make brackets a bit like Jacks from the forum, so that I can adjust the height of the cross bars which will attach the pivots to the car.
Chris

Jack Austin's (Twigworker) Rotisserie

Top pivot before completion
No comments have been posted yet...
Want to leave a comment or ask the owner a question?
Sign in or register a new account — it's free

No comments have been posted yet...
Want to leave a comment or ask the owner a question?
Sign in or register a new account — it's free